After some thinking I have decided to move this blog to Wordpress. I had to change the name of the blog but I am happy with the change. Hopefully this move will spur me on to update more frequently!
The new name is CactusGlobe, and you can find the blog at www.cactusglobe.com.
-Karl
Sunday 13 September 2015
Tuesday 23 June 2015
Oreocereus trollii
Just a couple of weeks ago I noticed a bud developing on an Oreocereus trollii in the greenhouse. It's always a little extra exciting when columnar species flower because they usually take quite a lot longer to reach flowering age than the globular ones, and this species had never flowered before. I sadly missed the show, though my father was there to document it. I'm not quite sure how old it is, though I'd venture a guess at around 15-20 years perhaps, and it's probably around 25 cm tall.
Oreocereus are found in the Andes of Peru, Bolivia, Chile and Argentina at altitudes between ca. 1000 - 4000 m a.s.l. O. trollii is found in southern Bolivia and northern Argentina at around 4000 m a.s.l. The great amount of hair on the plant is there to protect it against wind and cold. This particular species doesn't become any taller than between 50-100 cm. It's a testament to the adaptability of cacti that this species can thrive and flower at sea level in Norway (almost 60°N) when its habitat is near 20°S at 4000 m a.s.l. in the Andes, approximately 11 000 km away!
 |
| Oreocereus trollii with its first flower. |
 |
| Close-up of the flower. I quite like the purple anthers. |
 |
| Another close-up of the flower. The combination of the flower colour, the yellow spines and the white hairs is quite attractive. |
Monday 22 June 2015
About me
I thought I should probably write something about myself, so here is a short background story.
As I wrote in another post, I'm 31 years old and currently live and work in Oslo, Norway. My wife and I (we married this year) live in a nice flat, but obviously we'll need to move onto something bigger soon or there won't be enough space for all the cacti. C'est la vie.
I grew up in Kristiansand, in the south of Norway. My two greenhouses are still there, full of plants that my father takes great care of in my absence. Hopefully I will be able to relieve him of some of those duties once me and my wife find a suitable house with a nice garden to put a greenhouse.
Before moving to Oslo I spent six years studying at the University of Bergen on the west coast of Norway. There I did an M.Sc. in physical geography/Quaternary geology focusing on the last glacial period in Norway, particularly with respect to the advance and extent of the ice sheet, the landforms left behind, and palaeoclimatology. I spent two summers doing field work in the Dovre mountains in central Norway as part of my thesis and had a lot of fun. Though, with cacti in mind, maybe I should have done a thesis on palaeoclimatology in the Andes instead, with particular focus on its biogeographical effect on cactus evolution...
Though collecting cacti and succulents is my main hobby, I also have a keen interest in geology and palaeontology, and enjoy collecting rocks and fossils. I'm a football fan too, and apart from supporting my home team Start, I'm also a Liverpool supporter. I also enjoy video games and books, so it's hard sometimes to find the time for it all!
 |
| Me, enjoying the September sun on my 31st birthday. |
Update
It's been a long time now since my last post. My apologies to those of you who have been stopping by over the past few months hoping for updates! I will try to publish more often in the future, and start with a pictorial update of some more flowering over the past few months. All the plants shown below are between 16-20 months old at the time the pictures were taken.
First off, my Pseudolithos cubiformis and P. mccoyi have simply not stopped flowering over the past year. Whenever one plant has begun flowering another has set buds, and so on. Thankfully the smell (or stench) of rotten meat from the flowers isn't very noticeable unless you get your nose up close to them. I still haven't been able to pollinate any of the flowers, but with summer now arrived I hope that some flies might come along and help out.
I've also had a bit more flowering from my Adenium, with A. multiflorum continuing to flower, but now also joined by one A. obesum. At this age all of A. multiflorum, A. obesum and A. arabicum look rather similar superficially, with only some small differences in leaf shape. The flower colour between A. multiflorum and A. obesum was very different, though I'm not sure how variable the flower colour is or whether it stays true to the species. I am not even sure whether the above three are really separate species or just forms of one variable species.
A few months ago Lithops werneri produced a flower, so far being the only species of Lithops that have decided to start doing so. Two plants of this species have flowered now, and both kept the flowers open for over a week.
My Turbinicarpus longispinus, much like the Pseudolithos, have simply kept on flowering continuously for a year now (also see previous post on this species). I am surprised that they aren't taking a break. I suppose my conditions with the artificial light and regular watering might simply be confusing them into believing that they're in a never ending flowering season. It is also a bit surprising that this species is so ready to flower, while other Turbinicarpus species I have that are just as old and by their physical appearance should be ready to flower, have not yet done so. I expect the reason must simply be that some species of the genus require a (probably cooler) resting period while others don't need this in order to flower.
The last pictures in this update are of two new Mammillaria species flowering for the first time. Some decades ago these two species were thought to belong to a different genus than Mammillaria and the genus Solisia was erected for the two of them. I'm not really sure exactly why this was done and especially not why these two species were thought to deserve their own genus. Apart from some physical similarities (particularly spination) I don't really see a close resemblance between them, and the genus Solisia was abandoned a long time ago.
That's it for this post. Hopefully there'll be some more flowering in the nursery over the coming months for me to show, but the next post will be about plants in my greenhouse.
First off, my Pseudolithos cubiformis and P. mccoyi have simply not stopped flowering over the past year. Whenever one plant has begun flowering another has set buds, and so on. Thankfully the smell (or stench) of rotten meat from the flowers isn't very noticeable unless you get your nose up close to them. I still haven't been able to pollinate any of the flowers, but with summer now arrived I hope that some flies might come along and help out.
 |
| Pseudolithos cubiformis with a bunch of buds ready to open. |
 |
| P. cubiformis with the flowers just starting to open. |
 |
| P. cubiformis with all the flowers open. They stay open for about two days. |
 |
| Two P. cubiformis in flower. Unfortunately I don't know how to pollinate them without the help of flies. |
 |
| Pseudolithos mccoyi in flower. The flowers are quite a lot smaller than P. cubiformis and the structure looks very different (at least superficially). The flowers of this species don't really smell much. |
 |
| Close-up of a flower of P. mccoyi. The flower is approximately 5 mm wide. |
I've also had a bit more flowering from my Adenium, with A. multiflorum continuing to flower, but now also joined by one A. obesum. At this age all of A. multiflorum, A. obesum and A. arabicum look rather similar superficially, with only some small differences in leaf shape. The flower colour between A. multiflorum and A. obesum was very different, though I'm not sure how variable the flower colour is or whether it stays true to the species. I am not even sure whether the above three are really separate species or just forms of one variable species.
 |
| Adenium multiflorum with pretty pink and white flowers. |
 |
| A. multiflorum flower at very close range. |
 |
| Adenium obesum with flowers that look more or less identical in structure to A. multiflorum, only with a different flower colour. The deep pinkish-red colour is very attractive, though. |
 |
| A zoomed out picture of the A. obesum pictured above. |
A few months ago Lithops werneri produced a flower, so far being the only species of Lithops that have decided to start doing so. Two plants of this species have flowered now, and both kept the flowers open for over a week.
 |
| Lithops werneri with a tall flower tube. |
 |
| Close-up of the flower of L. werneri, showing a pretty yellow colour. |
My Turbinicarpus longispinus, much like the Pseudolithos, have simply kept on flowering continuously for a year now (also see previous post on this species). I am surprised that they aren't taking a break. I suppose my conditions with the artificial light and regular watering might simply be confusing them into believing that they're in a never ending flowering season. It is also a bit surprising that this species is so ready to flower, while other Turbinicarpus species I have that are just as old and by their physical appearance should be ready to flower, have not yet done so. I expect the reason must simply be that some species of the genus require a (probably cooler) resting period while others don't need this in order to flower.
 |
| Turbinicarpus longispinus in flower. |
The last pictures in this update are of two new Mammillaria species flowering for the first time. Some decades ago these two species were thought to belong to a different genus than Mammillaria and the genus Solisia was erected for the two of them. I'm not really sure exactly why this was done and especially not why these two species were thought to deserve their own genus. Apart from some physical similarities (particularly spination) I don't really see a close resemblance between them, and the genus Solisia was abandoned a long time ago.
 |
| Mammillaria solisioides showing both flower and buds. The flower is approximately 3 cm wide. |
 |
| Close-up of the flower of M. solisioides. The heat from the lamps has caused the petals of this flower to bend backwards. |
 |
| Mammillaria pectinifera with a large bud. So far this is the only plant of this species that has flowered. |
 |
| M. pectinifera with the flower just opened. The colour is a very pretty and delicate shade of pinkish-white with a slightly darker mid-stripe on the petals. |
 |
| M. pectinifera with the flower wide open. The flower is approximately 2,5 cm wide. |
That's it for this post. Hopefully there'll be some more flowering in the nursery over the coming months for me to show, but the next post will be about plants in my greenhouse.
Sunday 16 November 2014
The Nursery (Part 9: Soil components)
In this post I will expand upon Part 4 of this series and go into more detail about the various soil components I currently use (to a larger or lesser degree) for my cacti and succulents. I will first discuss organic and inorganic soil, and then go through the different soil components I use to a larger and lesser degree.
I prefer an inorganic soil to an organic based one for most of my plants when they are past the seedling stage. There are several reasons for this. One is that most of the species I'm currently growing (and most of those I like the best) are susceptible to overwatering and thus require a very free draining soil which doesn't retain moisture for a long time. This is easier to achieve with an inorganic soil than an organic one. Another is that inorganic soils reduce or eliminate the risk of several pests such as the sciara fly and (I believe) the root mealy bug. A further reason is that an inorganic soil with little or no freely available nitrogen will more easily induce a compact form of growth, compared to organic based soils in which plants more easily stretch.
Yet another reason is that with an inorganic soil it is possible to grow the plants completely without the use of fertiliser and have them look very natural (approximating the "natural" look in habitat), though I am not currently growing any of my plants without fertiliser. If one chooses to grow the plants without fertiliser, one must take care to choose a soil mix that contains all the nutrients the plants need. In the journal Acta Succulenta which is a free online journal available for download from their website Acta Succulenta, there is a very interesting article in the second publication of this year discussing a method of growing cacti they call WIG (Wild Grown). A similar method is discussed at length in a Xerophilia Magazine special edition called "The Rock Eaters", which is also an excellent guide to the use of inorganic soils. It is available for download from their homepage Xerophilia. Personally I find plants grown this way to look more beautiful than plants seen grown in organic soils which tend to become more elongated or bloated - though this also depends on the species.
A very interesting article which appeared on the BBC a few years ago ago reveals how (many or most?) cacti live in symbiosis with bacteria in the soil that break down rocks around the roots allowing them to absorb nutrients that wouldn't otherwise be available. It also shows how the plants incorporate these bacteria into their seeds. This explains how it is possible to achieve excellent results by growing cacti in 100% inorganic soil without using fertiliser.
I grow almost all my current North American species in an inorganic soil. Only about one tray with North American species are potted in an organic based soil in order to compare their growth with similar species grown in an inorganic soil. So far the plants grown in the inorganic soil seem to do better and stay more compact. Since they all share the same level of light and amount and frequency of waterings, as well as the amount of fertiliser given and soil volume, and they're all the same age, I think the only thing of importance that separates them is the soil composition. The ones in an organic based soil (particularly Epithelantha and Mammillaria) all tend to elongate and become more bloated compared to those grown in an inorganic soil.
I do grow some species in an organic based soil because I feel they do better with some organic matter. Chiefly among those are the South American species such as Rebutia, Sulcorebutia, Lobivia and Frailea (and any other South American species not growing in particularly arid environments). I kept my Frailea asterioides in an inorganic soil for some time, but they grew only very slowly. I keep my Discocactus horstii in an inorganic soil, however, and they are all growing very well - though in nature they grow in almost pure quartzite sand and gravel.
What you decide to grow your plants in will depend on your own beliefs and ideas on which soil is the best, which soil components are readily available where you live, the cost of the various soil components, and the types of species you like to grow. There is no answer to which soil is the best and almost every book on cacti will offer different advice. One should also keep in mind that cacti grown in pots are wholly removed from their natural habitat and must be treated accordingly. Adaptations must be made to account for a (probably) much reduced living space for the roots, a different fungal and bacterial flora in the soil, and of course usually a vastly different climate.
Just like seeds will readily germinate in commercial cactus soil mix, so will most species grow happily in the same mixes. They will be more prone to rotting though. If using such a mix I would definitely recommend adding extra grit such as perlite or gravel to increase the drainage.
Organic or inorganic soil
I prefer an inorganic soil to an organic based one for most of my plants when they are past the seedling stage. There are several reasons for this. One is that most of the species I'm currently growing (and most of those I like the best) are susceptible to overwatering and thus require a very free draining soil which doesn't retain moisture for a long time. This is easier to achieve with an inorganic soil than an organic one. Another is that inorganic soils reduce or eliminate the risk of several pests such as the sciara fly and (I believe) the root mealy bug. A further reason is that an inorganic soil with little or no freely available nitrogen will more easily induce a compact form of growth, compared to organic based soils in which plants more easily stretch.
Yet another reason is that with an inorganic soil it is possible to grow the plants completely without the use of fertiliser and have them look very natural (approximating the "natural" look in habitat), though I am not currently growing any of my plants without fertiliser. If one chooses to grow the plants without fertiliser, one must take care to choose a soil mix that contains all the nutrients the plants need. In the journal Acta Succulenta which is a free online journal available for download from their website Acta Succulenta, there is a very interesting article in the second publication of this year discussing a method of growing cacti they call WIG (Wild Grown). A similar method is discussed at length in a Xerophilia Magazine special edition called "The Rock Eaters", which is also an excellent guide to the use of inorganic soils. It is available for download from their homepage Xerophilia. Personally I find plants grown this way to look more beautiful than plants seen grown in organic soils which tend to become more elongated or bloated - though this also depends on the species.
 |
| Example of an inorganic soil. |
A very interesting article which appeared on the BBC a few years ago ago reveals how (many or most?) cacti live in symbiosis with bacteria in the soil that break down rocks around the roots allowing them to absorb nutrients that wouldn't otherwise be available. It also shows how the plants incorporate these bacteria into their seeds. This explains how it is possible to achieve excellent results by growing cacti in 100% inorganic soil without using fertiliser.
I grow almost all my current North American species in an inorganic soil. Only about one tray with North American species are potted in an organic based soil in order to compare their growth with similar species grown in an inorganic soil. So far the plants grown in the inorganic soil seem to do better and stay more compact. Since they all share the same level of light and amount and frequency of waterings, as well as the amount of fertiliser given and soil volume, and they're all the same age, I think the only thing of importance that separates them is the soil composition. The ones in an organic based soil (particularly Epithelantha and Mammillaria) all tend to elongate and become more bloated compared to those grown in an inorganic soil.
I do grow some species in an organic based soil because I feel they do better with some organic matter. Chiefly among those are the South American species such as Rebutia, Sulcorebutia, Lobivia and Frailea (and any other South American species not growing in particularly arid environments). I kept my Frailea asterioides in an inorganic soil for some time, but they grew only very slowly. I keep my Discocactus horstii in an inorganic soil, however, and they are all growing very well - though in nature they grow in almost pure quartzite sand and gravel.
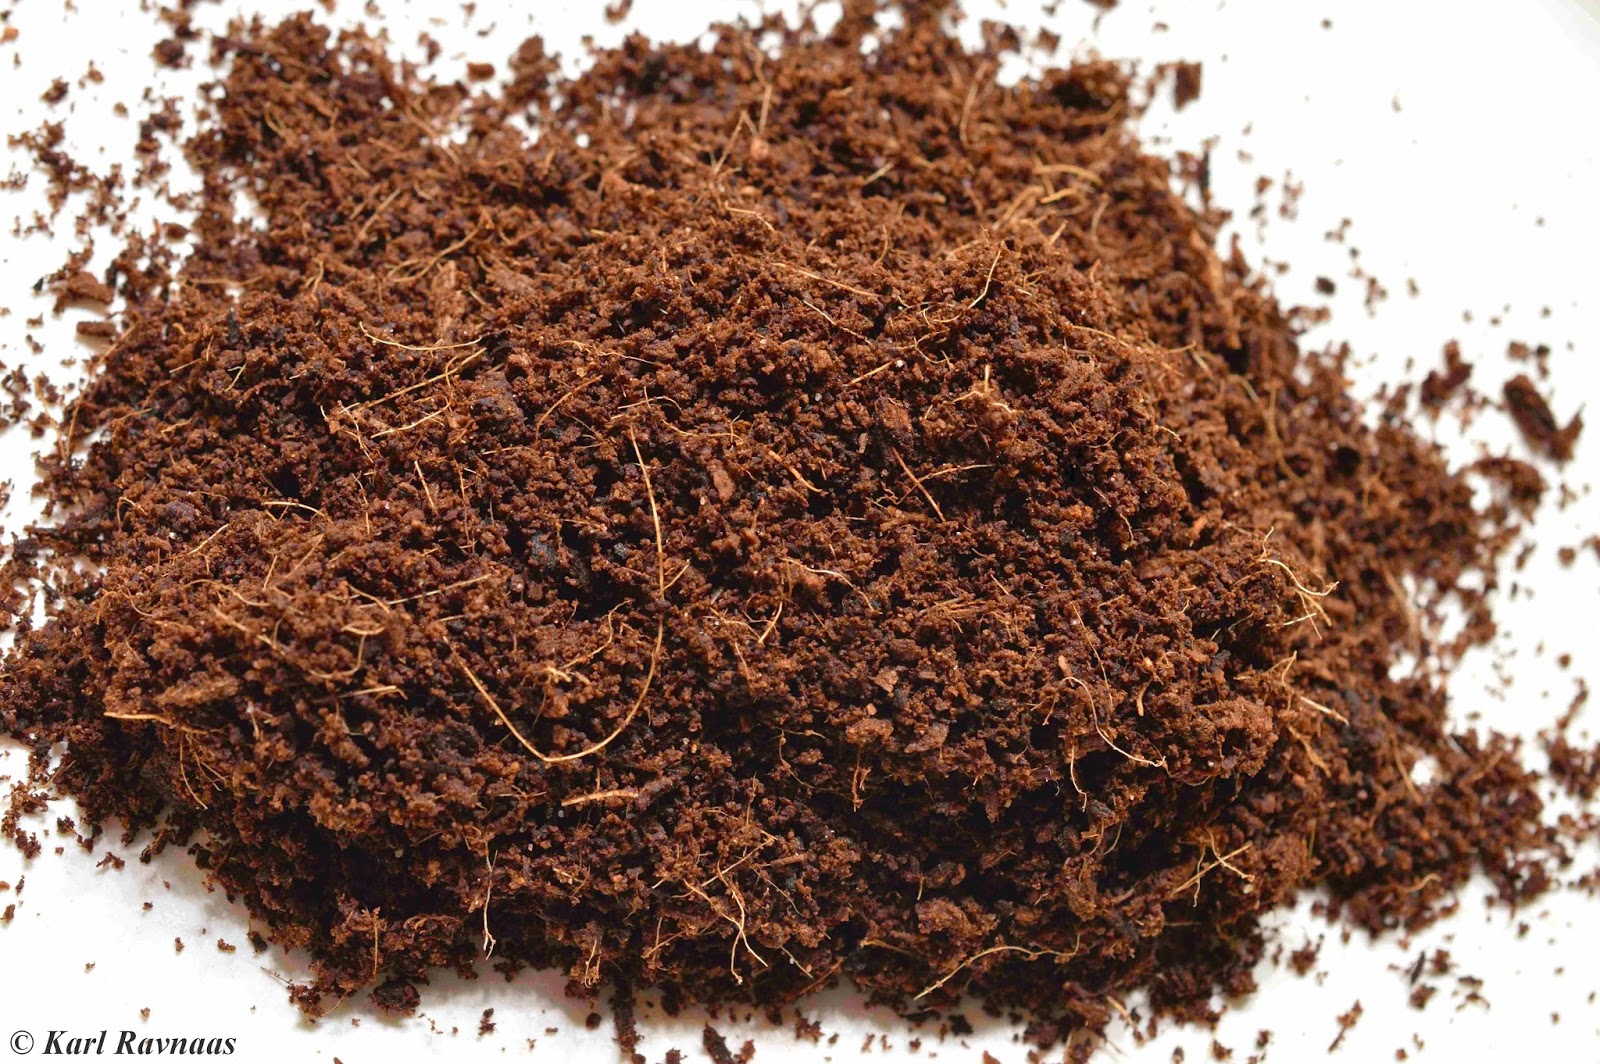
 |
| Example of an organic soil. This one is based on coir. |
What you decide to grow your plants in will depend on your own beliefs and ideas on which soil is the best, which soil components are readily available where you live, the cost of the various soil components, and the types of species you like to grow. There is no answer to which soil is the best and almost every book on cacti will offer different advice. One should also keep in mind that cacti grown in pots are wholly removed from their natural habitat and must be treated accordingly. Adaptations must be made to account for a (probably) much reduced living space for the roots, a different fungal and bacterial flora in the soil, and of course usually a vastly different climate.
Just like seeds will readily germinate in commercial cactus soil mix, so will most species grow happily in the same mixes. They will be more prone to rotting though. If using such a mix I would definitely recommend adding extra grit such as perlite or gravel to increase the drainage.
Soil components
There are a plethora of different soil components available, and the following simply represent the various things I have personally used and have experience with. As I said above, there is no "correct" soil and one grower will have positive experiences with one soil while another will not.
Peat
The only soil component that I would actively advice against is peat. I discussed my reasons for this in Part 4, but to summarise very shortly: peat takes a long time to dry out and when it has first dried out it is very difficult to re-wet; it is a magnet for the sciara fly, and the root mealy bug too, I believe; it quickly becomes compacted and reduces the amount of air available to the roots; it clings to the roots so that during repotting it is difficult to remove all of it without damaging the roots; it often leads to a less developed root system; it contains a high amount of nitrogen (and is often augmented with fertiliser high in nitrogen) which can lead to root burn and also abnormal growth; and finally it is not very environmentally friendly as the extraction of it destroys natural habitats for many species and can take centuries or millennia to reform, as well as leading to increased greenhouse gas emissions through the release of CO2 and MH4.
The only reason to use peat in my opinion is if you are just starting out with the hobby and only wish to keep a few species in the window sill, or if alternatives are very hard to come by.
Compost
I'm only mentioning this very quickly as it is probably the most commonly used ingredient in organic based soils. I do not use it myself because I have not found a good manufacturer yet. In Norway there is as good as a monopoly when it comes to garden centres, and by far the biggest (and almost only) garden centre does, to the best of my knowledge, not sell composts - at least not any that are useful for growing cacti. Some local garden centres or plant schools may still sell quality composts though, again, I have not really come across any. A good quality compost is probably the best ingredient to use in an organic based soil because it provides most of the nutrients the plants need which reduces the need for fertiliser.
Coir
Coir is fibres extracted from the husks of coconuts. It is a far better alternative than peat for organic soil mixes. Among the advantages are that it is naturally free of bacteria and fungi, it is easily rewettable after drying out, it doesn't compact like peat, it doesn't cling to the roots, and it rarely clumps together (and if so the clumps are very easily crumbled apart). Among the disadvantages is its lack of nutrients which means a greater need for fertiliser, its light weight (which in some cases can be an advantage, though), and the fact that it is poor in calcium and magnesium. A lack of magnesium is a problem for all plants, but a lack of calcium is also especially negative for most cacti. This can be remedied by adding calcium and magnesium through fertiliser or by adding rocks such as dolomite (containing both magnesium and calcium) directly to the soil. Dolomite is an excellent rock to add to the soil for most cacti regardless of whether you use coir or not.
Finally it is also important to check whether the coir you have has had fertiliser added to it. As with peat mixes, I believe fertiliser is often added to bags of coir too.
Finally it is also important to check whether the coir you have has had fertiliser added to it. As with peat mixes, I believe fertiliser is often added to bags of coir too.
 |
| Coir. A very good substitute for peat. |
Leca
Leca (light expanded clay aggregate) is produced artificially by heating clay at very high temperatures. It improves drainage and with it's honeycomb structure it also retains a lot of air. Leca usually comes in sizes too large to be of much use in small to medium size pots. In large or very large pots it would be useful as a soil additive. For smaller pot sizes the main use would be to increase drainage by placing a shallow layer of leca pebbles in the bottom of the pot. It can also be useful as top dressing in larger pots, though it should ideally be washed before use to remove the dust coating the pebbles.
 |
| Leca pebbles are usually too large to be of much use in small and medium size pots. |
Expanded shale
As with leca, this product has also been fired at high temperatures in order to make it expand. Shale is a naturally finely laminated (fissile) sedimentary rock consisting of clay and silt size particles. When it expands this structure leads to the rock becoming very porous. It has similar soil improving characteristics as leca, only more suitable for small to medium size pots. I have used two sizes, a 4-8 mm grain size and a 1-3 mm grain size. For smaller pots the larger grain size is still a little on the big side, but the smaller grain size is ideal. Similarly to leca it doesn't lose shape or disintegrate. The larger size expanded shale is also useful as a top dressing.
 |
| Expanded shale, grain size 4-8 mm. |
 |
| Expanded shale, grain size 1-3 mm. |
Crushed lava
This soil additive is, as the heading says, crushed lava. It is naturally a very porous rock increasing drainage and improving soil texture. It is heavier than artificially expanded materials and so adds a bit of weight to pots (which might otherwise become a bit light if a lot of material like coir or perlite is used). The grain size I have used is 2-8 mm, which is on the large side for small pots. It is also useful as a top dressing, though its sharp edges may cut or scrape the plant as it grows and expands.
 |
| Crushed lava, grain size 2-8 mm. |
Pumice
Pumice is a highly porous volcanic rock and a very good soil additive. Much like the materials mentioned above, it improves soil drainage and structure, as well as retaining water and air which is slowly made available for the roots. It comes in many different sizes, though - like the above materials - the larger sizes are less suitable for small and medium pots.
 |
| Pumice, grain size 5-15 mm. |
 |
| Pumice, grain size 2-5 mm. |
Zeolite
Zeolite is a very porous aluminosilicate mineral. It occurs naturally but can also be produced artificially. I use a natural form which comes in gravel size. It is widely used as an adsorbant in various industries. It absorbs a lot of water and, due to its molecular structure, can retain various elements. The idea behind using it in the soil is that its capacity to adsorb and retain elements will lead to these becoming available to the roots as the water stored in the mineral is released as the soil dries. However, I am uncertain if it actually works as intended in the soil. To me it seems like the zeolite doesn't really leach these "trapped" nutritional elements as the water drains from it, but rather builds them up to the extant that salts crystallize on the surface. If this is, in fact, the case then its usefulness is very limited since its other chief value of retaining water is achieved by lots of other materials. One other use would be top dressing for certain plants, as its green colour is very nice.
 |
| Zeolite, grain size ca. 5-10 mm. |
Crushed terracotta
This is another useful material to add to soil. Gravel size it acts to improve drainage and soil structure, as well as absorbing water which is then slowly released into the soil as it dries. In finer sizes it is useful as top dressing and soil component for seedlings. Made from clay, there are also a lot of various minerals available for the roots to extract.
 |
| Crushed terracotta, grain size ca. 4-6 mm. |
 |
| Crushed terracotta, grain size 0-2 mm. |
Clay
Clay can be a very useful additive in small components. Because of its very fine grain size it can reduce drainage in the soil and retain too much water if there is too much clay in the soil. It contains a large amount of elements however, and in small amounts it is a useful additive.
 |
| As can be seen on the picture, there are many large clumps of clay. These can be problematic in the soil as they can create areas where more water than desirable is accumulated. |
Akadama
Akadama is the name of clay pebbles that occur naturally in Japan. They are widely used in the bonzai industry because of their ability to absorb a lot of water and retain their structure as they dry, and repeat the process over and over. It improves drainage and aeration in the soil, as well as providing a lot of nutrients. It is an expensive product, however.
 |
| Akadama clay pebbles, grain size ca. 2-4 mm. |
Sand
Sand is a much used soil additive. Added to organic mixes it helps improve drainage and soil structure. However, in inorganic soils I believe it has a tendency to move around and cling together with other sand particles creating zones with more sand, which leads to reduced drainage. In many cases it may be better to use either coarse sand or fine gravel which will do the same job as sand, but not potentially impact negatively on drainage.
 |
| Sieved filter sand, grain size 1-2 mm. |
Gravel
Gravel, particularly as crushed rock, is a useful soil additive to improve drainage and structure. It is probably the cheapest inorganic material too (along with sand). If you want to grow in a completely inorganic soil it is perfectly possible to do so by combining gravel from different rocks and minerals in the soil to provide all the nutrients the plants need. For seedlings and in small pots it may be of less value as smaller size material will probably be better, but in medium to large pots it is an excellent additive. It is also excellent as top dressing.
 |
| Crushed phyllite, grain size ca. 5-10 mm. |
Diatomaceous earth
This is a light, porous sedimentary rock consisting of fossilised remains of diatoms. It consists mainly of silica and some aluminium. It comes in a range of grain sizes from dust all the way up to gravel size, and has a wide variety of uses. It retains water and nutrients which is slowly released as the soil dries. I don't have a lot of experience with this material but it seems a good soil additive.
 |
| Diatomaceous earth, grain size 1-3 mm. |
Perlite
This is an extremely light volcanic material that occurs naturally, but is used only after being processed by firing it at very high temperatures, expanding the material greatly. It helps improve drainage and soil structure, while having a fairly low water retention capacity. It is a very useful material and fairly cheap, however its low weight can be an issue as the perlite particles will very easily float to the surface of the pot - especially if watered from above.
 |
| Perlite, grain size ca. 3-6 mm. |
Vermiculite
Vermiculite is a naturally occurring siliceous mineral that expands greatly when fired - like perlite. After being processed in this way it becomes a very useful soil additive to improve drainage, for retaining water and nutrients, and for increasing soil structure. While also extremely light, it doesn't float to the surface like perlite.
 |
| Vermiculite, grain size ca. 3-8 mm. |
Mineral magic
This material is something I don't quite know the usefulness of as a soil additive. It is a dust-like yellowish material that is supposed to contain 65 different minerals and 60 % of the content is supposed to be water soluble silicates. Spread around the top of the soil it is supposed to prevent algae and fungi growth, while as a foliar spray it is supposed to act as an insecticide. As a soil additive I don't know whether it is a very useful substance considering all the minerals it supposedly contains, or whether the dust size grains merely leads to reduced drainage. It is supposed to increase the cation exchange rate in the soil which should lead to more nutrients being available for the roots. I add a little bit of it in my soil mixes. If it does what it claims it should be a useful additive.
 |
| Mineral magic. With a saguaro (Carnegiea gigantea) pictured on the label it surely can't hurt to add to the soil! |
Conclusion
In the end, it isn't really critical to use one particular soil component or the other. I have tried out quite a few because I've been curious about how they work, but many of the materials talked about above do much the same thing. The important part about soil is that it should be well drained and have a good structure with plenty of air. Whether this is accomplished through an inorganic soil or an organic based one isn't that important. The amount of the various materials is only really important when it comes to growing plants without the use of fertiliser at all, since then one must strike the right balance in the soil between the various components so that all essential and beneficial nutrients are provided.
The size of the collection and which materials are most easily (and cheaply) available will usually be the deciding factors on which soil components to use.
Sunday 9 November 2014
The Nursery (Part 8: First flowers)
For once there'll be a post with less text and more images! I feel flowering is one of the best ways to see whether your plants are doing well. If they are of flowering age and their growing conditions are good all cacti will generally be happy to produce flowers. If not, they will be much more reluctant to flower - although flowering can also be induced by high levels of stress or such things as manipulating the plant's hormones. As I mentioned in the post about fertilisers and additives, I do add a few drops of certain plant extracts with most waterings that are supposed to increase flowering, so it's possible this may have had an effect on some of the species.
Seeing the little plants develop from seedlings to flowering plants is very rewarding and one of the best parts of the hobby. I plan on giving them about a month's rest in December to try and induce more flowering. The oldest plants will then be about 16 months old and I think a lot more will be ready to flower at that point.
The first of the plants I sowed in late July/early August 2013 to start flowering did so in February, approximately six months after germination. The one to start it all off was Pseudolithos mccoyi. I have no experience with this genus so I don't know whether it usually starts flowering at a very young age. Since they began flowering in February they've kept it up ever since, and now 9 months later they're still at it. I have no idea how to pollinate them. As far as I know it's done by flies in nature (though the flowers don't smell anything), but it doesn't seem like any flies have visited them over the past months. I don't know who this species was named for, but I like to think it was Star Trek's Dr. Leonard McCoy!
The second species to start flowering was Turbinicarpus longispinus at 7 months old. The name is a nom. prov. (nomen provisorium) meaning a provisional name, and as far as I know has never been validly published.
It is supposed to be a synonym of T. rioverdensis ssp. paolii, which is again a synonym of T. rioverdensis according to Hunt et al. (2006), Pilbeam & Weightman (2006) and Zachar (2004). Furthermore, the same authorities place this taxon as a subspecies under Turbinicarpus schmiedickeanus as T. schmiedickeanus ssp. rioverdensis. This should then be the current name of the species.
However, if T. longispinus is indeed a synonym of T. rioverdensis ssp. paolii, then according to Donati & Zanovello (2005) it should be called T. klinkerianus ssp. schwarzii as they claim it is just a re-description of T. schwarzii which they place under T. klinkerianus. If they are correct, the name of the species according to Hunt et al. (2006), Pilbeam & Weightman (2006) and Zachar (2004) should then be T. schmiedickeanus ssp. macrochele since they place T. schwarzii under synonomy with this taxon.
So...what to think? I now have the following options depending on which authority I'd like to follow: T. longispinus nom. prov., T. rioverdensis ssp. paolii, T. rioverdensis, T. schmiedickeanus var. rioverdensis, T. schmiedickeanus var. macrochele and T. klinkerianus ssp. schwarzii. A Gordian knot if ever I saw one!
I am not particularly inclined to agree with Donati & Zanovello (2005) as I think their recombinations of species and way of classifying species is a bit odd. But what exactly to call it I'm not sure. It seems to me to be similar to all of the above mentioned species. I will have to delve into the matter a bit deeper before deciding on anything, so for now they'll stay as T. longispinus. It's a nice plant though!
The next one out was Mammillaria roemeri at 9 months old. Originally only one plant germinated, but some months later another seedling appeared to keep the first one company. It produced just one flower and hasn't attempted to flower again since. It is a relatively new discovery and according to Hunt et al (2006) it is likely just a neotenic (retaining juvenile characteristics into adulthood) form of Mammillaria lasiacantha. It certainly seems to be a neotenic form, though whether it is just a form of M. laiacantha I feel is too soon to say (at least for me).
After this, Adenium multiflorum decided to go next at 12 months old. I can't honestly say that it looks very different in appearance compared to my A. obesum or A. arabicum apart from being slightly taller and more elongated, but maybe it will in age.
Mammillaria hernandezii was the next one out at 11 months old, and put on quite a show for about a month. About seven different plants produced flowers, though none of them produced more than one. I kept pollen in the fridge and pollinated every flower so I expect some of them will have set fruit, though it's difficult to tell since they are cryptocarps, keeping the fruits hidden in the plant body.
At the same time Mammillaria plumosa began flowering, also at 11 months old. It's a very pretty plant and while the flowers aren't as spectacular as in M. hernandezii, they are nevertheless charming. Both these species usually flower late in the year from autumn to winter, so I was pleasantly surprised not just that they flowered but that they flowered in September already. A lack of sunlight is usually the cause for their lack of willingness to flower in Northern Europe, so I take it as evidence that they're receiving sufficient and good quality light from my artificial lighting.
I have a grand, old and elongated lady Euphorbia obesa that has faithfully produced flowers every summer for years now but, sadly, she's remained an old spinster. Until now that is, when a strapping young lad appeared ready to pollinate everything in sight!
The next one to start flowering was Pseudolithos cubiformis at 14 months old. It is a lovely plant with very interesting flowers. It does look quite like a rock and I can well imagine it must be difficult to find in habitat. The flowers smell like rotting meat in order to attract flies. I had no flies on hand, and without them I believe it is quite difficult to pollinate these plants. If anyone knows a good method to pollinate them I'd love to hear it!
Finally, the last plant to flower so far was Rebutia narvaecensis 'espinosae' at 14 months old. The name 'espinosae' was never validly published according to Pilbeam (1997), so the label should perhaps just read Rebutia narvaecensis - though according to a recent molecular phylogenetic study by Ritz et al. (2007) it should probably be called Aylostera narvaecensis instead. In any case, I've sown regular R. narvaecensis too, so I won't be changing labels quite until I see whether there are some notable differences between them.
Donati, D. & Zanovello, C. 2005. Knowing, understanding, growing Turbinicarpus - Rapicactus. Cactus Trentino Südtirol, Trento, 254 p.
Hunt, D. (ed.), Taylor, N., Charles, G. 2006. The New Cactus Lexicon [Text]. dh books, Milborne Port, 374 p.
Pilbeam, J. 1997. Rebutia. Cirio Publishing Services Ltd., Southampton, 160 p.
Pilbeam, J. & Weightman, B. 2006. Ariocarpus et cetera. BCSS, Essex, 140 p.
Ritz, C.M., Martins, L., Mecklenburg, R., Goremykin, V., Hellwig, F.H. 2007. The molecular phylogeny of Rebutia (Cactaceae) and its allies demonstrates the influence of paleogeography on the evolution of South American mountain cacti. American Journal of Botany 94, 1321-1332.
Zachar, M. 2004. The Genus Turbinicarpus. Spolocnost Cactaceae etc., Bratislava, 144 p.
Seeing the little plants develop from seedlings to flowering plants is very rewarding and one of the best parts of the hobby. I plan on giving them about a month's rest in December to try and induce more flowering. The oldest plants will then be about 16 months old and I think a lot more will be ready to flower at that point.
Pseudolithos mccoyi
The first of the plants I sowed in late July/early August 2013 to start flowering did so in February, approximately six months after germination. The one to start it all off was Pseudolithos mccoyi. I have no experience with this genus so I don't know whether it usually starts flowering at a very young age. Since they began flowering in February they've kept it up ever since, and now 9 months later they're still at it. I have no idea how to pollinate them. As far as I know it's done by flies in nature (though the flowers don't smell anything), but it doesn't seem like any flies have visited them over the past months. I don't know who this species was named for, but I like to think it was Star Trek's Dr. Leonard McCoy!
 |
| Pseudolithos mccoyi starting to flower at six months old. The top dressing is crushed lava and the plants are blending in very well! |
 |
| A closer look at the flowers of Pseudolithos mccoyi. This plant is 14 months old here, and it and its brethren have been flowering non-stop for 9 months so far. The flowers are tiny at no more than 5 mm wide. Some of the P. mccoyi (such as this one) have developed a very nice greyish bloom on the epidermis. |
Turbinicarpus longispinus nom. prov.
The second species to start flowering was Turbinicarpus longispinus at 7 months old. The name is a nom. prov. (nomen provisorium) meaning a provisional name, and as far as I know has never been validly published.
It is supposed to be a synonym of T. rioverdensis ssp. paolii, which is again a synonym of T. rioverdensis according to Hunt et al. (2006), Pilbeam & Weightman (2006) and Zachar (2004). Furthermore, the same authorities place this taxon as a subspecies under Turbinicarpus schmiedickeanus as T. schmiedickeanus ssp. rioverdensis. This should then be the current name of the species.
However, if T. longispinus is indeed a synonym of T. rioverdensis ssp. paolii, then according to Donati & Zanovello (2005) it should be called T. klinkerianus ssp. schwarzii as they claim it is just a re-description of T. schwarzii which they place under T. klinkerianus. If they are correct, the name of the species according to Hunt et al. (2006), Pilbeam & Weightman (2006) and Zachar (2004) should then be T. schmiedickeanus ssp. macrochele since they place T. schwarzii under synonomy with this taxon.
So...what to think? I now have the following options depending on which authority I'd like to follow: T. longispinus nom. prov., T. rioverdensis ssp. paolii, T. rioverdensis, T. schmiedickeanus var. rioverdensis, T. schmiedickeanus var. macrochele and T. klinkerianus ssp. schwarzii. A Gordian knot if ever I saw one!
I am not particularly inclined to agree with Donati & Zanovello (2005) as I think their recombinations of species and way of classifying species is a bit odd. But what exactly to call it I'm not sure. It seems to me to be similar to all of the above mentioned species. I will have to delve into the matter a bit deeper before deciding on anything, so for now they'll stay as T. longispinus. It's a nice plant though!
 |
| Turbinicarpus longispinus in bud at 7 months old. The spination is variable, and not all the plants have longer than usual spines. This plant is about 1,5 cm in diameter. |
 |
| Detail of the flower of Turbinicarpus longispinus. The flower is approximately 2,5 cm tip to tip. |
 |
| Turbinicarpus longispinus at 11 months old. It was cross pollinated and, as can be seen, the fruit has just split open revealing the seeds inside. This plant, ca. 2 cm in diameter, does not have particularly long spines. |
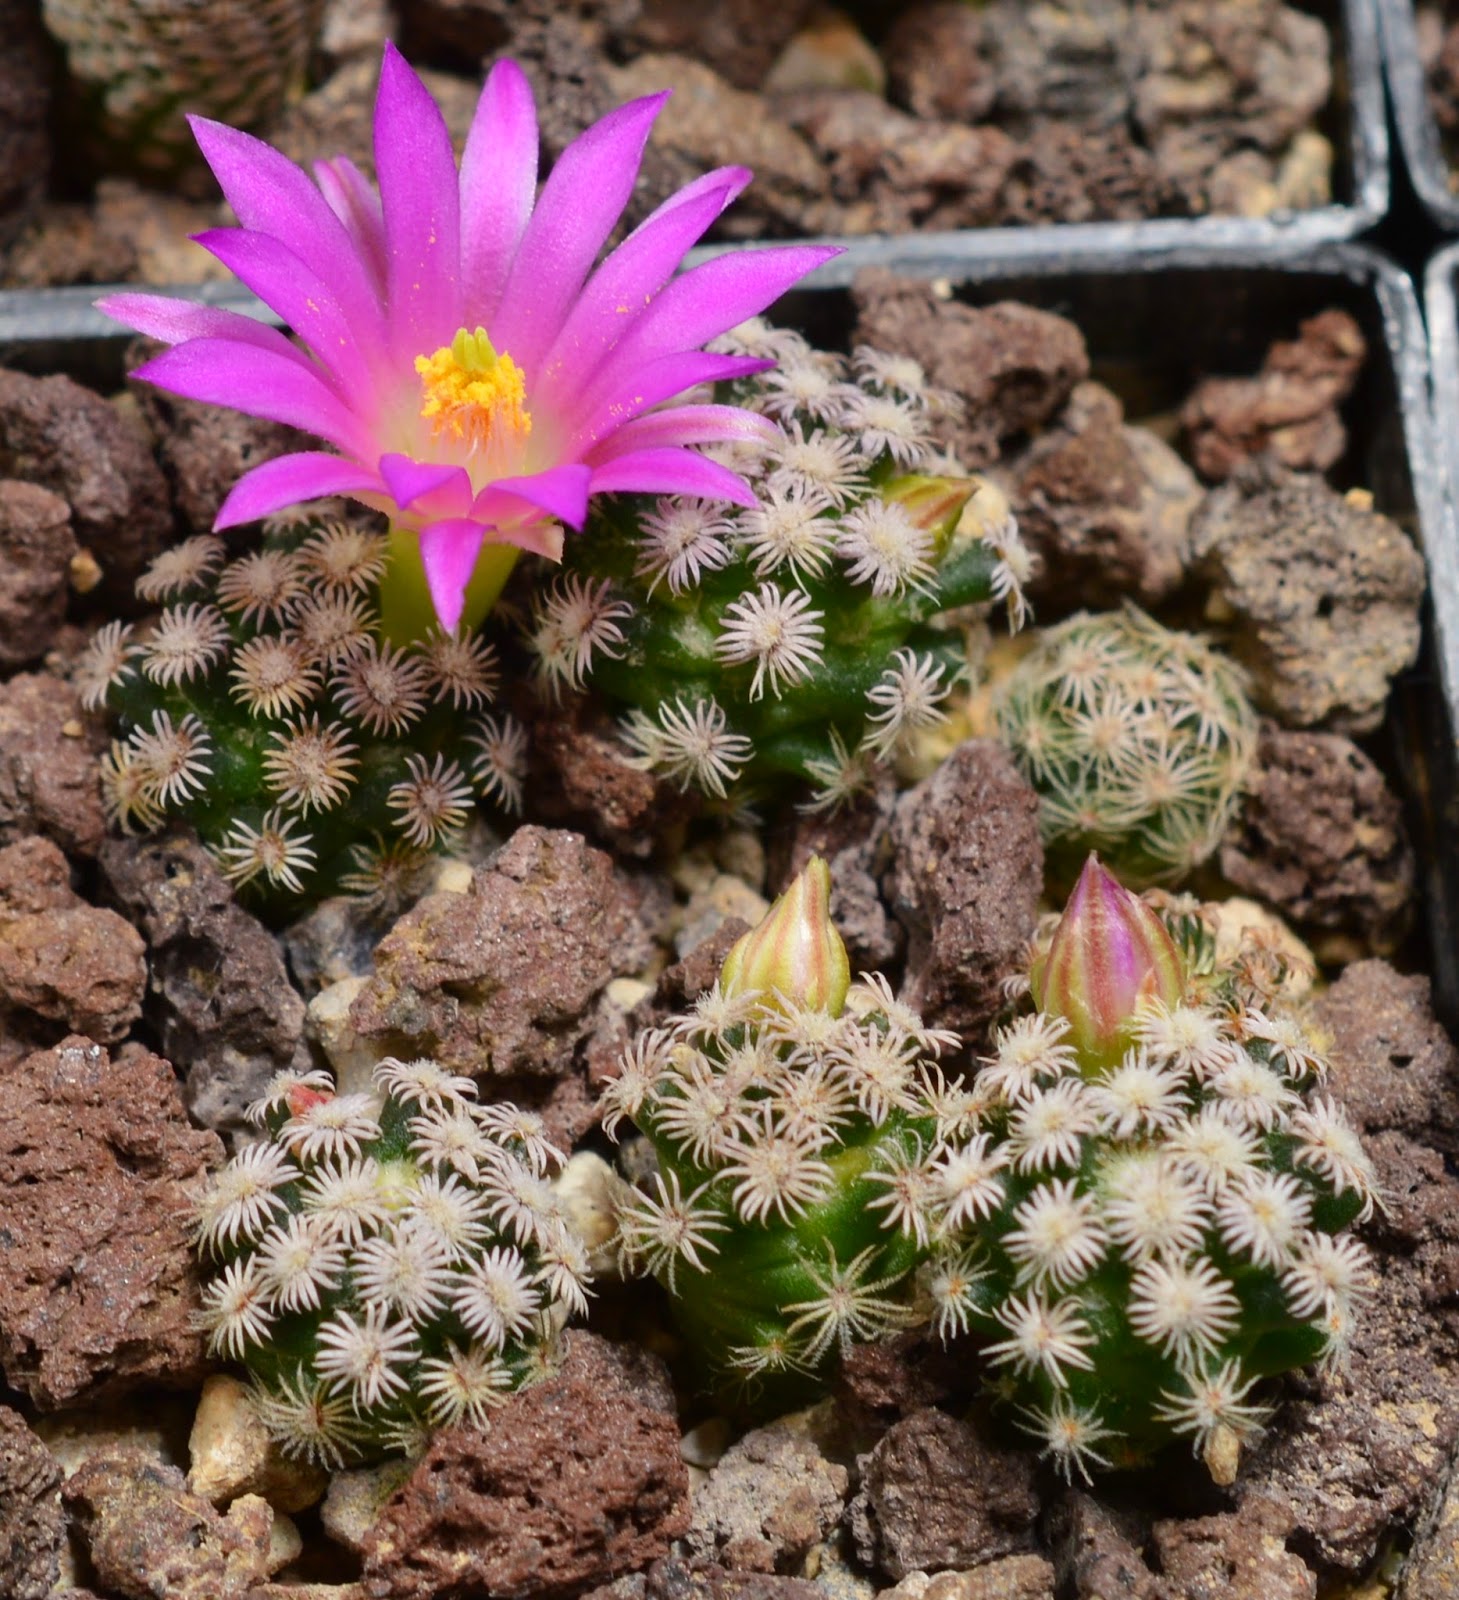
Mammillaria roemeri
The next one out was Mammillaria roemeri at 9 months old. Originally only one plant germinated, but some months later another seedling appeared to keep the first one company. It produced just one flower and hasn't attempted to flower again since. It is a relatively new discovery and according to Hunt et al (2006) it is likely just a neotenic (retaining juvenile characteristics into adulthood) form of Mammillaria lasiacantha. It certainly seems to be a neotenic form, though whether it is just a form of M. laiacantha I feel is too soon to say (at least for me).
 |
| Mammillaria roemeri in bud. The plant is about 2 cm in diameter. |
 |
| Mammillaria roemeri with the flower wide open. It's a very nice shade of pink with a slightly darker mid stripe. The flower is about 1,5 cm in diameter. |
Adenium multiflorum
After this, Adenium multiflorum decided to go next at 12 months old. I can't honestly say that it looks very different in appearance compared to my A. obesum or A. arabicum apart from being slightly taller and more elongated, but maybe it will in age.
 |
| Adenium multiflorum with buds. It's about 15 cm tall. |
 |
| Adenium multiflorum with lovely coloured flowers. The flowers are ca. 6 cm in diameter. |
Mammillaria hernandezii
Mammillaria hernandezii was the next one out at 11 months old, and put on quite a show for about a month. About seven different plants produced flowers, though none of them produced more than one. I kept pollen in the fridge and pollinated every flower so I expect some of them will have set fruit, though it's difficult to tell since they are cryptocarps, keeping the fruits hidden in the plant body.
 |
| The first Mammillaria hernandezii to start flowering. As can be seen there are several plants with buds. The plants are approximately 1,5-2 cm in diameter. |
 |
| Close-up of Mammillaria hernandezii with flower. The colour is very nice and the camera doesn't quite do it justice. The flowers are ca. 2 cm in diameter. |
Mammillaria plumosa
At the same time Mammillaria plumosa began flowering, also at 11 months old. It's a very pretty plant and while the flowers aren't as spectacular as in M. hernandezii, they are nevertheless charming. Both these species usually flower late in the year from autumn to winter, so I was pleasantly surprised not just that they flowered but that they flowered in September already. A lack of sunlight is usually the cause for their lack of willingness to flower in Northern Europe, so I take it as evidence that they're receiving sufficient and good quality light from my artificial lighting.
 |
| Mammillaria plumosa with a pretty little yellowish flower just starting to open. The plant is ca. 3 cm in diameter. |
 |
| Mammillaria plumosa with the flower wide open. The flower is ca. 1 cm i diameter. It produced two more flowers before decided that was quite enough. |
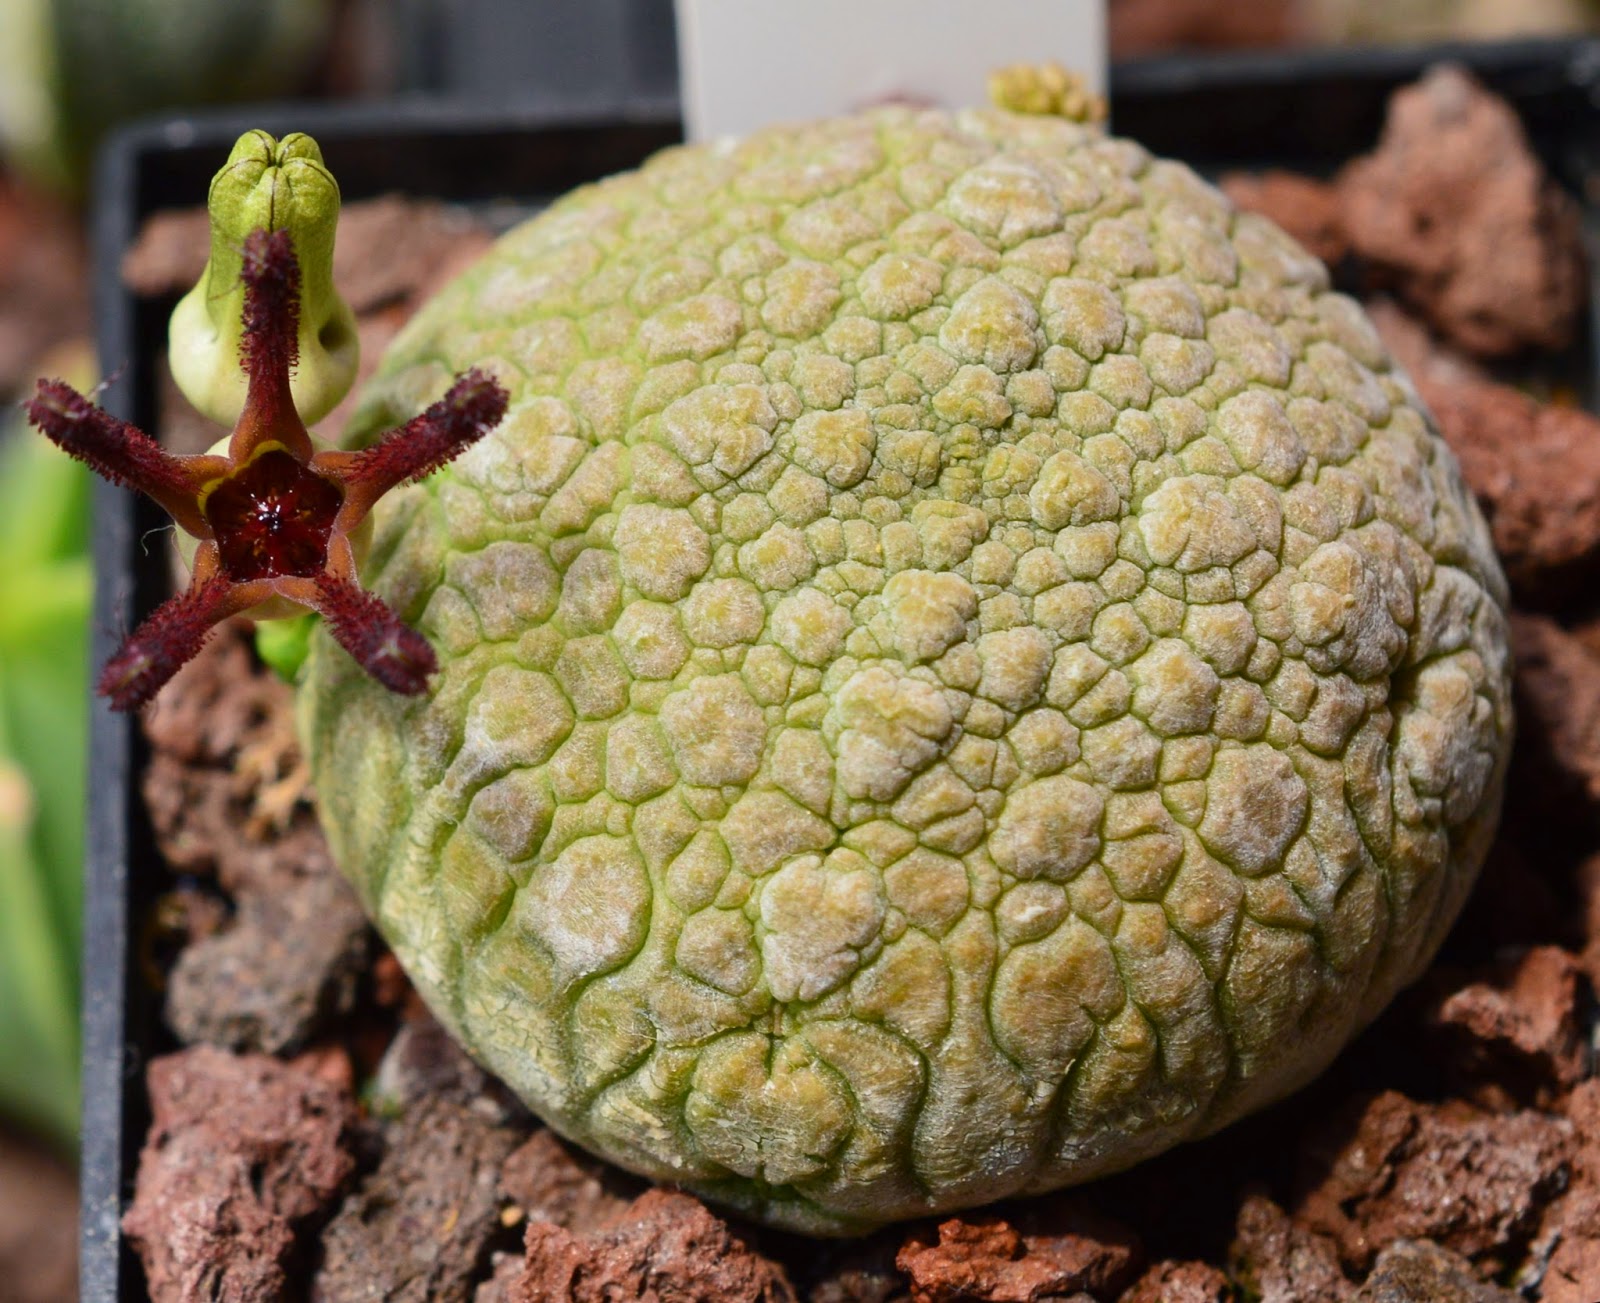
Euphorbia obesa
I have a grand, old and elongated lady Euphorbia obesa that has faithfully produced flowers every summer for years now but, sadly, she's remained an old spinster. Until now that is, when a strapping young lad appeared ready to pollinate everything in sight!
 |
| The old, yet still very fertile, Euphorbia obesa with lots of seed pods! |
 |
| The male Euphorbia obesa at 13 months old, ready to enjoy life. This species has male and female flowers and without one of each there'll be no little children. The plant is ca. 3,5-4 cm in diameter. |
 |
| Another female E. obesa, also 13 months old. This one has also been visited by the male pictured above and the fruit is just starting to develop. |
 |
| The same E. obesa as pictured above. One seed pod is still maturing while the first one has just popped. Popped is really quite an accurate word to use because the fruits do actually pop when mature. There are three fairly big seeds in each pod and if you don't take care to harvest at the right moment the seeds may just escape you since they can be flung quite some distance by the force of the exploding pod. In the lower part of the picture can be seen some of the remains of the pod that popped, but the seeds probably disappeared in some pot somewhere. Maybe they'll germinate some day... |
Pseudolithos cubiformis
The next one to start flowering was Pseudolithos cubiformis at 14 months old. It is a lovely plant with very interesting flowers. It does look quite like a rock and I can well imagine it must be difficult to find in habitat. The flowers smell like rotting meat in order to attract flies. I had no flies on hand, and without them I believe it is quite difficult to pollinate these plants. If anyone knows a good method to pollinate them I'd love to hear it!
 |
| Pseudolithos cubiformis with a cluster of buds on the right. The plant is ca. 4 cm in diameter. In the lower part of the picture can be seen another cluster of buds about to develop, though they haven't developed yet. |
 |
| Pseudolithos cubiformis with one flower just opening and another about to open right behind. The flower is ca. 1,5 cm in diameter and smelled like rotten meat. These two flowers are the only ones that have developed from the large cluster seen in the image above. |
 |
| I must admit I have no experience with Pseudolithos from before, so I don't really know what this is. Based on this picture I assume the species produces male and female flowers like Euphorbia obesa, though I don't really know whether these are male or female. The flowers are very small - probably no more than a couple of millimetres in diameter. I'd love to hear any tips or tricks to get these plants to set fruit. |
Rebutia narvaecensis 'espinosae'
Finally, the last plant to flower so far was Rebutia narvaecensis 'espinosae' at 14 months old. The name 'espinosae' was never validly published according to Pilbeam (1997), so the label should perhaps just read Rebutia narvaecensis - though according to a recent molecular phylogenetic study by Ritz et al. (2007) it should probably be called Aylostera narvaecensis instead. In any case, I've sown regular R. narvaecensis too, so I won't be changing labels quite until I see whether there are some notable differences between them.
 |
| Rebutia narvaecensis 'espinosae' with their very pretty flowers. It tentatively began with this one flower, but it seems it thought the whole thing rather enjoyable and is now setting several more buds. |
 |
| The same Rebutia narvaecensis 'espinosae' from a slightly different angle showing the flower tube and the plant more clearly. The flower is ca. 2 cm wide, while the plant is probably about 2,5 cm wide. |
Bibliography:
Donati, D. & Zanovello, C. 2005. Knowing, understanding, growing Turbinicarpus - Rapicactus. Cactus Trentino Südtirol, Trento, 254 p.
Hunt, D. (ed.), Taylor, N., Charles, G. 2006. The New Cactus Lexicon [Text]. dh books, Milborne Port, 374 p.
Pilbeam, J. 1997. Rebutia. Cirio Publishing Services Ltd., Southampton, 160 p.
Pilbeam, J. & Weightman, B. 2006. Ariocarpus et cetera. BCSS, Essex, 140 p.
Ritz, C.M., Martins, L., Mecklenburg, R., Goremykin, V., Hellwig, F.H. 2007. The molecular phylogeny of Rebutia (Cactaceae) and its allies demonstrates the influence of paleogeography on the evolution of South American mountain cacti. American Journal of Botany 94, 1321-1332.
Zachar, M. 2004. The Genus Turbinicarpus. Spolocnost Cactaceae etc., Bratislava, 144 p.
Subscribe to:
Posts (Atom)